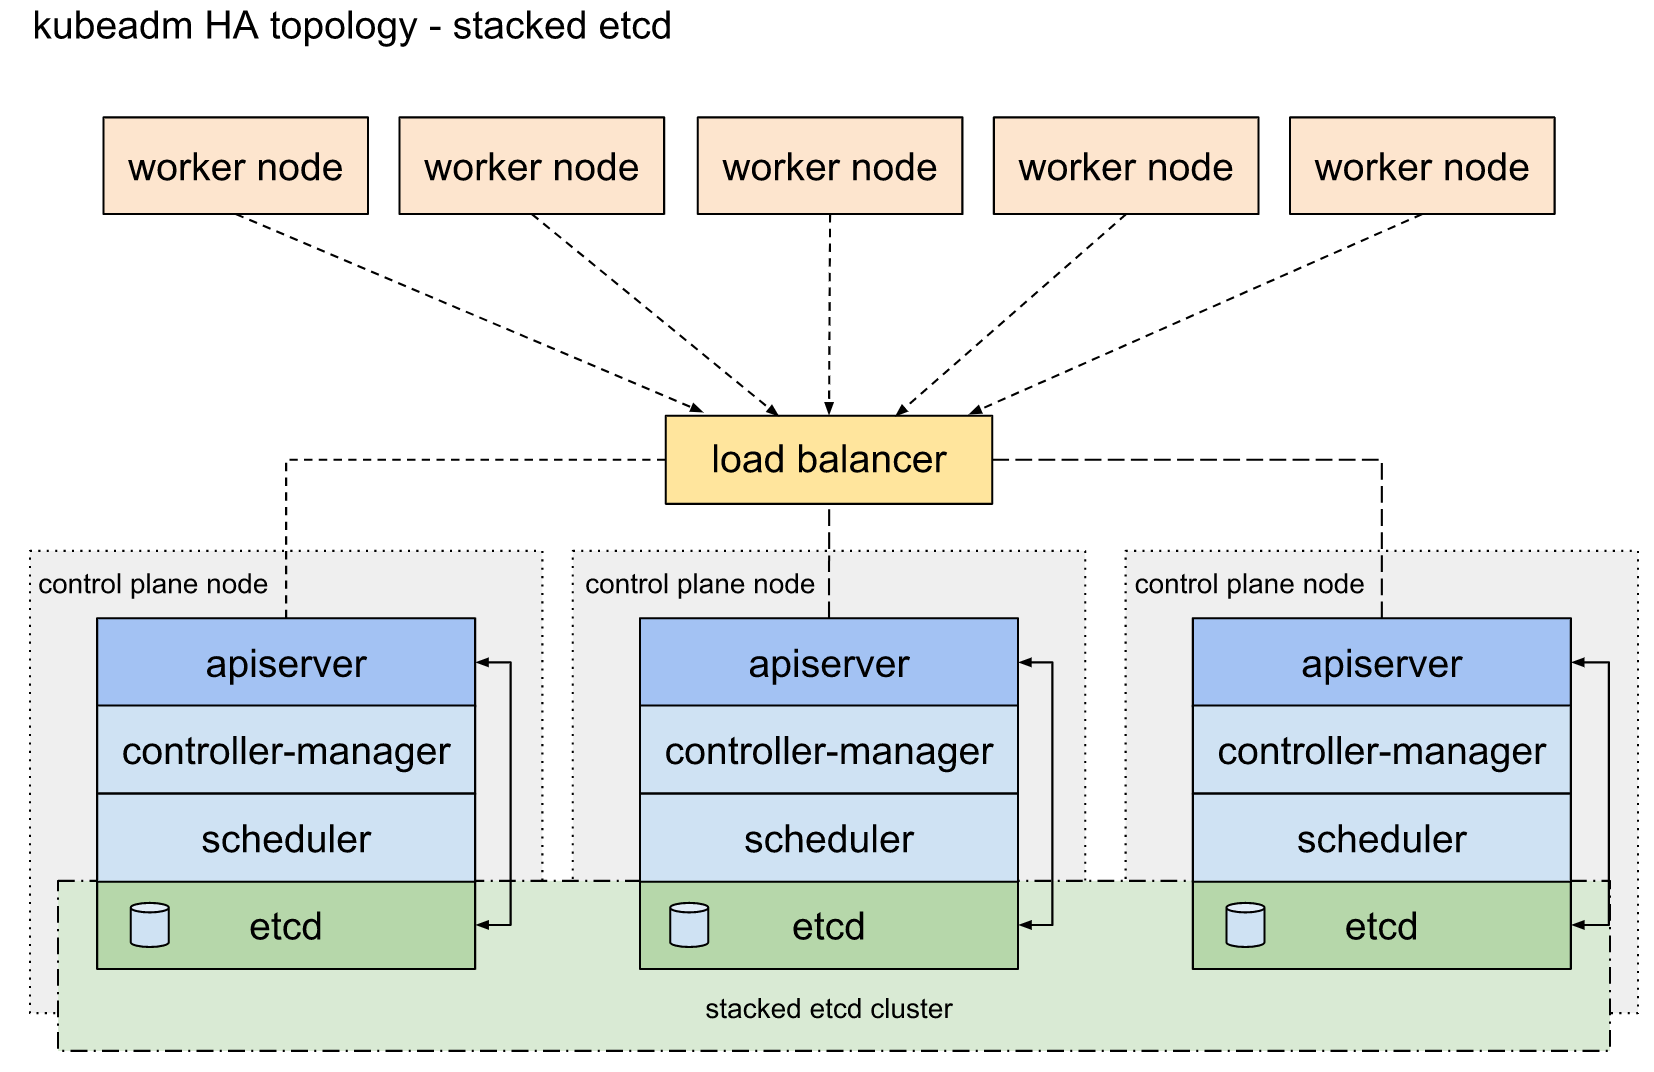
部署说明 堆叠ETCD 每个master节点上运行一个apiserver和etcd, etcd只与本节点apiserver通信。
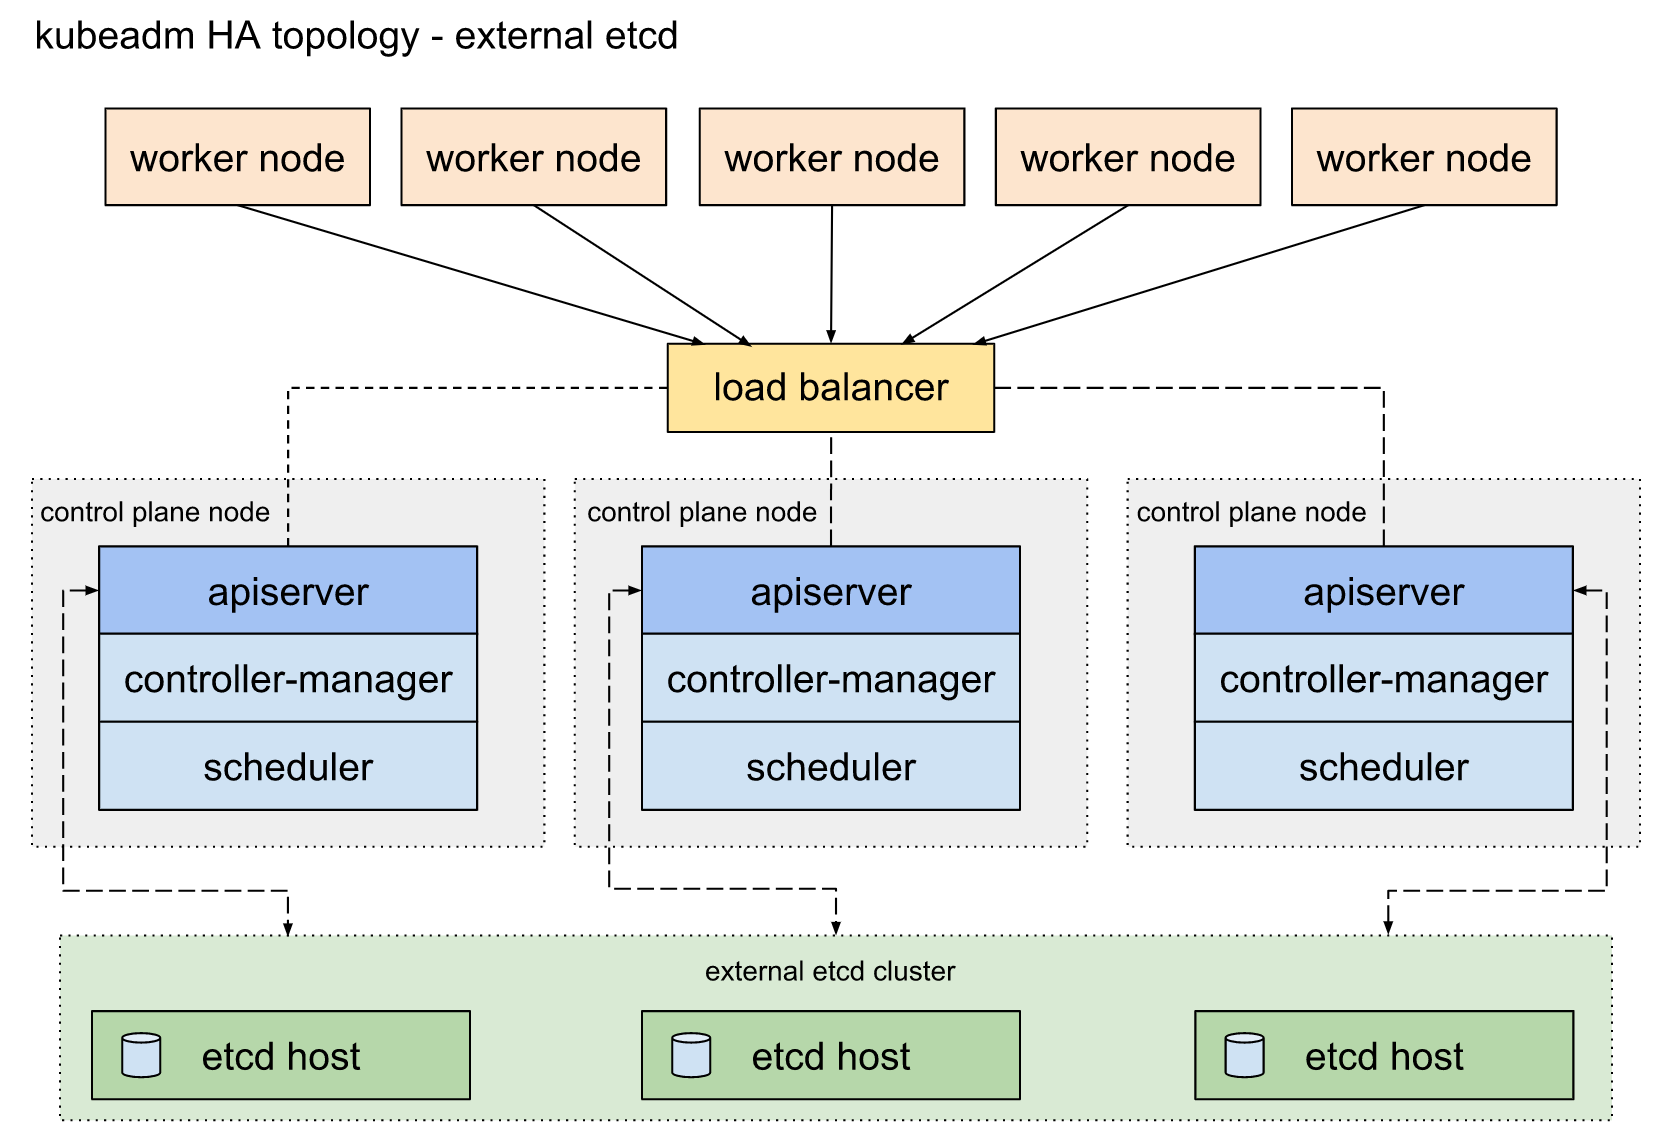
外部ETCD etcd集群运行在单独的主机上,每个etcd都与apiserver节点通信。
本次部署方案 环境 Centos 7.6
相关文档:https://kubernetes.io/docs/setup/production-environment/tools/kubeadm/high-availability/ https://kubernetes.io/docs/setup/production-environment/tools/kubeadm/ha-topology/#external-etcd-topology
etcd 集群 下载证书生成工具 1 2 3 4 5 6 #etcd三台机器安装创建证书所需软件 curl -o /usr/local/bin/cfssl https://pkg.cfssl.org/R1.2/cfssl_linux-amd64 curl -o /usr/local/bin/cfssljson https://pkg.cfssl.org/R1.2/cfssljson_linux-amd64 curl -o /usr/local/bin/cfssl-certinfo https://pkg.cfssl.org/R1.2/cfssl-certinfo_linux-amd64 #cfssl授权 chmod +x /usr/local/bin/cfssl*
创建CA 1 2 3 4 5 6 7 8 9 10 11 12 13 14 15 16 17 18 19 20 21 22 23 24 25 26 27 28 29 30 31 32 33 34 35 36 37 38 39 40 41 42 43 44 45 46 47 48 49 50 51 52 53 54 55 56 57 58 59 60 61 62 63 64 65 66 67 #以下操作在 etcd1 机器执行 mkdir -p /etc/kubernetes/pki/etcd cd /etc/kubernetes/pki/etcd #创建 CA 配置文件(ca-config.json) #我们可以创建一个初始的ca-config.json文件,如:cfssl print-defaults config > ca-config.json,然后对其进行修改。 cat >ca-config.json <<EOF { "signing": { "default": { "expiry": "876000h" }, "profiles": { "etcd": { "usages": [ "signing", "key encipherment", "server auth", "client auth" ], "expiry": "876000h" } } } } EOF #对上面的字段进行说明 "ca-config.json":可以定义多个 profiles,分别指定不同的过期时间、使用场景等参数;后续在签名证书时使用某个 profile; "signing":表示该证书可用于签名其它证书;生成的 ca.pem 证书中 CA=TRUE; "server auth":表示client可以用该 CA 对server提供的证书进行验证; "client auth":表示server可以用该CA对client提供的证书进行验证; #创建 CA 证书签名请求(ca-csr.json) cat >ca-csr.json <<EOF { "CN": "etcd", "key": { "algo": "rsa", "size": 2048 }, "names": [ { "C": "CN", "ST": "shanghai", "L": "shanghai", "O": "etcd", "OU": "System" } ] } EOF #对上面的字段进行说明 "CN":Common Name,etcd 从证书中提取该字段作为请求的用户名 (User Name);浏览器使用该字段验证网站是否合法; "O":Organization,etcd 从证书中提取该字段作为请求用户所属的组 (Group); 这两个参数在后面的kubernetes启用RBAC模式中很重要,因为需要设置kubelet、admin等角色权限,那么在配置证书的时候就必须配置对了,具体后面在部署kubernetes的时候会进行讲解。 "在etcd这两个参数没太大的重要意义,跟着配置就好。" #生成 CA 证书和私钥 cfssl gencert -initca ca-csr.json | cfssljson -bare ca #证书文件说明 * 生成 "ca.csr ca-key.pem ca.pem" 三个文件 * ca.pem 根证书公钥文件 * ca-key.pem 根证书私钥文件 * ca.csr 证书签名请求,用于交叉签名或重新签名 * ca-config.json 使用cfssl工具生成其他类型证书需要引用的配置文件 * ca.pem用于签发后续其他的证书文件,因此ca.pem文件需要分发到集群中的每台服务器上去
创建etcd证书 1 2 3 4 5 6 7 8 9 10 11 12 13 14 15 16 17 18 19 20 21 22 23 24 25 26 27 28 29 30 31 #创建etcd的TLS认证证书 #创建 etcd证书签名请求(etcd-csr.json) cd /etc/kubernetes/pki/etcd cat > etcd-csr.json <<EOF { "CN": "etcd", "hosts": [ "10.168.4.5", "10.168.4.6", "10.168.4.12", "master01", "master02", "master03" ], "key": { "algo": "rsa", "size": 2048 }, "names": [ { "C": "CN", "ST": "shanghai", "L": "shanghai", "O": "etcd", "OU": "System" } ] } EOF #生成 etcd证书和私钥 cfssl gencert -ca=ca.pem -ca-key=ca-key.pem -config=ca-config.json -profile=etcd etcd-csr.json | cfssljson -bare etcd
etcd免密认证和证书拷贝 1 2 3 4 5 6 7 8 9 10 11 12 13 #etcd三台机器执行 #三台机器免密认证 ssh-copy-id root@<etcd1-ip-address> ssh-copy-id root@<etcd2-ip-address> ssh-copy-id root@<etcd3-ip-address> #etcd2&etcd3执行 mkdir -p /etc/kubernetes/pki/etcd cd /etc/kubernetes/pki/etcd scp root@10.168.4.5:/etc/kubernetes/pki/etcd/ca.pem . scp root@10.168.4.5:/etc/kubernetes/pki/etcd/ca-key.pem . scp root@10.168.4.5:/etc/kubernetes/pki/etcd/etcd.pem . scp root@10.168.4.5:/etc/kubernetes/pki/etcd/etcd-key.pem . scp root@10.168.4.5:/etc/kubernetes/pki/etcd/ca-config.json .
etcd集群部署 1 2 3 4 5 6 7 8 9 10 11 12 13 14 15 16 17 18 19 20 21 22 23 24 25 26 27 28 29 30 31 32 33 34 35 36 37 38 39 40 41 42 43 44 45 46 47 48 49 50 51 52 53 54 55 56 57 58 59 60 61 62 63 64 65 66 67 68 69 70 71 72 73 74 75 76 77 78 79 80 81 82 83 84 85 86 87 88 89 90 91 92 93 94 95 96 97 98 99 #etcd三台机器安装etcd可执行文件 mkdir -p /data/sys/var/etcd chmod -R 777 /data/sys/var/etcd ln -s /data/sys/var/etcd /var/lib/etcd export ETCD_VERSION=v3.4.4 curl -sSL https://github.com/coreos/etcd/releases/download/${ETCD_VERSION}/etcd-${ETCD_VERSION}-linux-amd64.tar.gz | tar -xzv --strip-components=1 -C /usr/local/bin/ 或者 export ETCD_VER=v3.4.4 curl -L https://storage.googleapis.com/etcd/${ETCD_VER}/etcd-${ETCD_VER}-linux-amd64.tar.gz #配置etcd三台机器执行 #创建etcd环境配置文件 touch /etc/etcd.env echo "PEER_NAME=master01" >> /etc/etcd.env #另外两台就是master02/03 echo "PRIVATE_IP=10.168.4.5" >> /etc/etcd.env #另外两台就是10.168.4.6/10.168.4.12 cat /etc/systemd/system/etcd.service [Unit] Description=etcd Documentation=https://github.com/coreos/etcd Conflicts=etcd.service Conflicts=etcd2.service [Service] EnvironmentFile=/etc/etcd.env Type=notify Restart=always RestartSec=5s LimitNOFILE=40000 TimeoutStartSec=0 ExecStart=/usr/local/bin/etcd --name ${PEER_NAME} \ --data-dir /var/lib/etcd \ --listen-client-urls https://${PRIVATE_IP}:2379 \ --advertise-client-urls https://${PRIVATE_IP}:2379 \ --listen-peer-urls https://${PRIVATE_IP}:2380 \ --initial-advertise-peer-urls https://${PRIVATE_IP}:2380 \ --cert-file=/etc/kubernetes/pki/etcd/etcd.pem \ --key-file=/etc/kubernetes/pki/etcd/etcd-key.pem \ --client-cert-auth \ --trusted-ca-file=/etc/kubernetes/pki/etcd/ca.pem \ --peer-cert-file=/etc/kubernetes/pki/etcd/etcd.pem \ --peer-key-file=/etc/kubernetes/pki/etcd/etcd-key.pem \ --peer-client-cert-auth \ --peer-trusted-ca-file=/etc/kubernetes/pki/etcd/ca.pem \ --initial-cluster <etcd1>=https://<etcd1-ip-address>:2380,<etcd2>=https://<etcd2-ip-address>:2380,<etcd3>=https://<etcd3-ip-address>:2380 \ --initial-cluster-token my-etcd-token \ --initial-cluster-state new [Install] WantedBy=multi-user.target 说明: * 将<etcd1><etcd2><etcd3>改为对应节点的hostname * 将<etcd1-ip-address><etcd2-ip-address><etcd3-ip-address>改为对应节点的通讯ip #启动etcd集群 systemctl daemon-reload systemctl start etcd systemctl enable etcd systemctl status etcd -l #etcd集群服务的信息 mkdir /etc/kubernetes/scripts cd /etc/kubernetes/scripts cat etcd.sh HOST_1=10.168.4.5 HOST_2=10.168.4.6 HOST_3=10.168.4.12 ENDPOINTS=$HOST_1:2379,$HOST_2:2379,$HOST_3:2379 #etcd集群健康信息 etcdctl --endpoints=$ENDPOINTS --cacert=/etc/kubernetes/pki/etcd/ca.pem --cert=/etc/kubernetes/pki/etcd/etcd.pem --key=/etc/kubernetes/pki/etcd/etcd-key.pem endpoint health #etcd集群状态信息 etcdctl --endpoints=$ENDPOINTS --cacert=/etc/kubernetes/pki/etcd/ca.pem --cert=/etc/kubernetes/pki/etcd/etcd.pem --key=/etc/kubernetes/pki/etcd/etcd-key.pem --write-out=table endpoint status #etcd集群成员信息 etcdctl --endpoints=$ENDPOINTS --cacert=/etc/kubernetes/pki/etcd/ca.pem --cert=/etc/kubernetes/pki/etcd/etcd.pem --key=/etc/kubernetes/pki/etcd/etcd-key.pem member list -w table #执行上面脚本打印如下sh etcd.sh [root@master01 scripts]# sh etcd.sh 10.168.4.5:2379 is healthy: successfully committed proposal: took = 12.350574ms 10.168.4.6:2379 is healthy: successfully committed proposal: took = 11.83104ms 10.168.4.12:2379 is healthy: successfully committed proposal: took = 13.326317ms +------------------+------------------+---------+---------+-----------+------------+-----------+------------+--------------------+--------+ | ENDPOINT | ID | VERSION | DB SIZE | IS LEADER | IS LEARNER | RAFT TERM | RAFT INDEX | RAFT APPLIED INDEX | ERRORS | +------------------+------------------+---------+---------+-----------+------------+-----------+------------+--------------------+--------+ | 10.168.4.5:2379 | 7db6f9384bffe8b2 | 3.4.4 | 20 kB | false | false | 76 | 52 | 52 | | | 10.168.4.6:2379 | bada5b5a99674a15 | 3.4.4 | 20 kB | true | false | 76 | 52 | 52 | | | 10.168.4.12:2379 | d54e4be0d69c6952 | 3.4.4 | 16 kB | false | false | 76 | 52 | 52 | | +------------------+------------------+---------+---------+-----------+------------+-----------+------------+--------------------+--------+ +------------------+---------+----------+--------------------------+--------------------------+------------+ | ID | STATUS | NAME | PEER ADDRS | CLIENT ADDRS | IS LEARNER | +------------------+---------+----------+--------------------------+--------------------------+------------+ | 7db6f9384bffe8b2 | started | master03 | https://10.168.4.5:2380 | https://10.168.4.12:2379 | false | | bada5b5a99674a15 | started | master02 | https://10.168.4.6:2380 | https://10.168.4.6:2379 | false | | d54e4be0d69c6952 | started | master03 | https://10.168.4.12:2380 | https://10.168.4.12:2379 | false | +------------------+---------+----------+--------------------------+--------------------------+------------+
部署keepalived 三台master机器均是如下操作
安装keepalived 1 2 yum install -y keepalived
配置keepalived 1 2 3 4 5 6 7 8 9 10 11 12 13 14 15 16 17 18 19 20 21 22 23 24 25 26 27 28 29 30 31 32 33 34 35 36 37 38 39 40 41 cd /etc/keepalived mv keepalived.conf keepalived.conf_bak cat > /etc/keepalived/keepalived.conf << EOF ! Configuration File for keepalived global_defs { router_id LVS_DEVEL } vrrp_script check_haproxy { script "killall -0 haproxy" interval 3 weight -2 fall 10 rise 2 } vrrp_instance VI_1 { state MASTER interface ens33 virtual_router_id 51 priority 250 #优先级保持唯一,这里master01为250,master02为200,master03为150 advert_int 1 authentication { auth_type PASS auth_pass 35f18af7190d51c9f7f78f37300a0cbd } virtual_ipaddress { 192.168.246.200 } track_script { check_haproxy } } EOF #上面配置文件说明 *记得修改上面配置文件priority * killall -0 根据进程名称检测进程是否存活 * master01节点为***MASTER***,其余节点为***BACKUP*** * priority各个几点到优先级相差50,范围:0~250(非强制要求),数值越大优先级越高~
启动并检测服务 1 2 3 4 5 6 7 8 9 10 11 12 13 14 15 16 17 18 19 systemctl enable keepalived.service systemctl start keepalived.service systemctl status keepalived.service #我们在master01主节点上,看下ip信息 [root@master01 ~]# ip a 1: lo: <LOOPBACK,UP,LOWER_UP> mtu 65536 qdisc noqueue state UNKNOWN group default qlen 1000 link/loopback 00:00:00:00:00:00 brd 00:00:00:00:00:00 inet 127.0.0.1/8 scope host lo valid_lft forever preferred_lft forever 2: eth0: <BROADCAST,MULTICAST,UP,LOWER_UP> mtu 1500 qdisc mq state UP group default qlen 1000 link/ether 52:54:00:cc:c3:63 brd ff:ff:ff:ff:ff:ff inet 10.168.4.5/24 brd 10.168.4.255 scope global eth0 valid_lft forever preferred_lft forever inet 10.168.4.100/32 scope global eth0 valid_lft forever preferred_lft forever 3: docker0: <NO-CARRIER,BROADCAST,MULTICAST,UP> mtu 1500 qdisc noqueue state DOWN group default link/ether 02:42:9a:96:0c:fd brd ff:ff:ff:ff:ff:ff inet 172.17.0.1/16 brd 172.17.255.255 scope global docker0 valid_lft forever preferred_lft forever
部署haproxy 三台机器均是如下步骤
安装HaProxy 配置haproxy /etc/haproxy 1 2 3 4 5 6 7 8 9 10 11 12 13 14 15 16 17 18 19 20 21 22 23 24 25 26 27 28 29 30 31 32 33 34 35 36 37 38 39 40 41 42 43 44 45 46 47 48 49 50 51 52 53 54 55 56 57 58 59 60 61 62 63 64 65 66 67 68 69 70 71 72 73 74 75 76 77 78 79 80 81 82 83 84 85 mv haproxy.cfg haproxy.cfg_bak cat > /etc/haproxy/haproxy.cfg << EOF #--------------------------------------------------------------------- # Global settings #--------------------------------------------------------------------- global # to have these messages end up in /var/log/haproxy.log you will # need to: # # 1) configure syslog to accept network log events. This is done # by adding the '-r' option to the SYSLOGD_OPTIONS in # /etc/sysconfig/syslog # # 2) configure local2 events to go to the /var/log/haproxy.log # file. A line like the following can be added to # /etc/sysconfig/syslog # # local2.* /var/log/haproxy.log # log 127.0.0.1 local2 chroot /var/lib/haproxy pidfile /var/run/haproxy.pid maxconn 4000 user haproxy group haproxy daemon # turn on stats unix socket stats socket /var/lib/haproxy/stats #--------------------------------------------------------------------- # common defaults that all the 'listen' and 'backend' sections will # use if not designated in their block #--------------------------------------------------------------------- defaults mode http log global option httplog option dontlognull option http-server-close option forwardfor except 127.0.0.0/8 option redispatch retries 3 timeout http-request 10s timeout queue 1m timeout connect 10s timeout client 1m timeout server 1m timeout http-keep-alive 10s timeout check 10s maxconn 3000 #--------------------------------------------------------------------- # kubernetes apiserver frontend which proxys to the backends #--------------------------------------------------------------------- frontend kubernetes-apiserver mode tcp bind *:16443 option tcplog default_backend kubernetes-apiserver #--------------------------------------------------------------------- # round robin balancing between the various backends #--------------------------------------------------------------------- backend kubernetes-apiserver mode tcp balance roundrobin server master01 10.168.4.5:6443 check #更改对应的主机名和IP server master02 10.168.4.6:6443 check #更改对应的主机名和IP server master03 10.168.4.12:6443 check #更改对应的主机名和IP #--------------------------------------------------------------------- # collection haproxy statistics message #--------------------------------------------------------------------- listen stats bind *:1080 stats auth admin:awesomePassword stats refresh 5s stats realm HAProxy\ Statistics stats uri /admin?stats EOF #说明: * 所有master节点上的配置完全相同
启动并检测服务 1 2 3 4 5 6 systemctl enable haproxy.service systemctl start haproxy.service systemctl status haproxy.service ss -lnt | grep -E "16443|1080" LISTEN 0 128 *:1080 *:* LISTEN 0 128 *:16443 *:*
安装kubeadm、kubectl、kubelet 三台机器均是如下操作
设置kubernetes的yum源 1 2 3 4 5 6 7 8 9 10 11 12 cat <<EOF > /etc/yum.repos.d/kubernetes.repo [kubernetes] name=Kubernetes baseurl=https://mirrors.aliyun.com/kubernetes/yum/repos/kubernetes-el7-x86_64 enabled=1 gpgcheck=1 repo_gpgcheck=1 gpgkey=https://mirrors.aliyun.com/kubernetes/yum/doc/yum-key.gpg https://mirrors.aliyun.com/kubernetes/yum/doc/rpm-package-key.gpg EOF yum clean all yum makecache fast
安装kubelet kubeadm kubectl 1 yum install -y kubelet kubeadm kubectl --disableexcludes=kubernetes
kubelet.service设置开机启动 1 2 3 systemctl enable kubelet.service 注意:这一步不能直接执行 systemctl start kubelet,会报错,成功初始化完后kubelet会自动起来
编辑hosts文件,添加如下内容 1 2 3 4 5 cat /etc/hosts 10.168.4.100 cluster.kube.com 10.168.4.5 master01 10.168.4.6 master02 10.168.4.12 master03
初始化第一个master节点 以下操作在master01节点进行
编辑kubeadm配置文件 1 2 3 4 5 6 7 8 9 10 11 12 13 14 15 16 17 18 19 20 21 22 23 24 mkdir -p /etc/kubernetes/my-conf cd /etc/kubernetes/my-conf cat >config.yaml <<EOF apiVersion: kubeadm.k8s.io/v1beta2 kind: ClusterConfiguration kubernetesVersion: 1.17.3 imageRepository: registry.cn-hangzhou.aliyuncs.com/google_containers etcd: external: endpoints: - https://10.168.4.5:2379 - https://10.168.4.6:2379 - https://10.168.4.12:2379 caFile: /etc/kubernetes/pki/etcd/ca.pem certFile: /etc/kubernetes/pki/etcd/etcd.pem keyFile: /etc/kubernetes/pki/etcd/etcd-key.pem networking: podSubnet: 10.244.0.0/16 #apiServer: # certSANs: # - "cluster.kube.com" controlPlaneEndpoint: "cluster.kube.com:16443" EOF
启动集群,获得返回命令用来加入集群 1 2 kubeadm init --config=config.yaml --upload-certs
注意下面初始化成功之后的信息,如下:
1 2 3 4 5 6 7 8 9 10 11 12 13 14 15 16 17 18 19 20 21 22 23 24 25 26 27 Your Kubernetes control-plane has initialized successfully! To start using your cluster, you need to run the following as a regular user: mkdir -p $HOME/.kube sudo cp -i /etc/kubernetes/admin.conf $HOME/.kube/config sudo chown $(id -u):$(id -g) $HOME/.kube/config You should now deploy a pod network to the cluster. Run "kubectl apply -f [podnetwork].yaml" with one of the options listed at: https://kubernetes.io/docs/concepts/cluster-administration/addons/ You can now join any number of the control-plane node running the following command on each as root: kubeadm join cluster.lolaage.com:6443 --token 9t4vc1.9q2mrf0cwmnpqmxx \ --discovery-token-ca-cert-hash sha256:8c0cb820a823e897ace35b73a5b50e05bb79d8b0e1998aab0e7d138ca8005f45 \ --control-plane --certificate-key 19d77056eba525205d134e92d3e92cf872aa03a4e17593dd25933f9ec8824375 Please note that the certificate-key gives access to cluster sensitive data, keep it secret! As a safeguard, uploaded-certs will be deleted in two hours; If necessary, you can use "kubeadm init phase upload-certs --upload-certs" to reload certs afterward. Then you can join any number of worker nodes by running the following on each as root: kubeadm join cluster.lolaage.com:6443 --token 9t4vc1.9q2mrf0cwmnpqmxx \ --discovery-token-ca-cert-hash sha256:8c0cb820a823e897ace35b73a5b50e05bb79d8b0e1998aab0e7d138ca8005f45
认证linux用户操作权限 1 2 3 mkdir -p $HOME/.kube cp -i /etc/kubernetes/admin.conf $HOME/.kube/config chown $(id -u):$(id -g) $HOME/.kube/config
查看节点 1 2 3 [root@master01 my-conf]# kubectl get node NAME STATUS ROLES AGE VERSION master01 NotReady master 2m5s v1.17.3
查看集群状态 1 2 3 4 5 6 7 [root@master01 my-conf]# kubectl get cs NAME STATUS MESSAGE ERROR scheduler Healthy ok controller-manager Healthy ok etcd-0 Healthy {"health":"true"} etcd-1 Healthy {"health":"true"} etcd-2 Healthy {"health":"true"}
动态查看 kube-system 命名空间下的pod 1 2 3 4 5 6 7 8 9 [root@master01 my-conf]# kubectl get pod -n kube-system -o wide -w NAME READY STATUS RESTARTS AGE IP NODE NOMINATED NODE READINESS GATES coredns-7f9c544f75-g6tsj 0/1 Pending 0 3m4s <none> <none> <none> <none> coredns-7f9c544f75-n2c2f 0/1 Pending 0 3m4s <none> <none> <none> <none> kube-apiserver-master01 1/1 Running 0 2m59s 10.168.4.5 master01 <none> <none> kube-controller-manager-master01 1/1 Running 0 2m59s 10.168.4.5 master01 <none> <none> kube-proxy-kcrzj 1/1 Running 0 3m4s 10.168.4.5 master01 <none> <none> kube-scheduler-master01 1/1 Running 0 2m58s 10.168.4.5 master01 <none> <none>
执行命令查看kubeadmin的配置 1 2 3 4 5 6 7 8 9 10 11 12 13 14 15 16 17 18 19 20 21 22 23 24 25 26 27 28 29 [root@master01 my-conf]# kubeadm config view apiServer: extraArgs: authorization-mode: Node,RBAC timeoutForControlPlane: 4m0s apiVersion: kubeadm.k8s.io/v1beta2 certificatesDir: /etc/kubernetes/pki clusterName: kubernetes controlPlaneEndpoint: cluster.lolaage.com:6443 controllerManager: {} dns: type: CoreDNS etcd: external: caFile: /etc/kubernetes/pki/etcd/ca.pem certFile: /etc/kubernetes/pki/etcd/etcd.pem endpoints: - https://10.168.4.5:2379 - https://10.168.4.6:2379 - https://10.168.4.12:2379 keyFile: /etc/kubernetes/pki/etcd/etcd-key.pem imageRepository: registry.cn-hangzhou.aliyuncs.com/google_containers kind: ClusterConfiguration kubernetesVersion: v1.17.3 networking: dnsDomain: cluster.local podSubnet: 10.244.0.0/16 serviceSubnet: 10.96.0.0/12 scheduler: {}
master02&master03执行 1 2 3 4 5 6 7 8 9 10 11 12 13 14 15 16 # master01执行 scp /etc/kubernetes/pki/ca.crt 10.168.4.6:/etc/kubernetes/pki/ scp /etc/kubernetes/pki/ca.key 10.168.4.6:/etc/kubernetes/pki/ scp /etc/kubernetes/pki/sa.key 10.168.4.6:/etc/kubernetes/pki/ scp /etc/kubernetes/pki/sa.pub 10.168.4.6:/etc/kubernetes/pki/ scp /etc/kubernetes/pki/ca.crt 10.168.4.12:/etc/kubernetes/pki/ scp /etc/kubernetes/pki/ca.key 10.168.4.12:/etc/kubernetes/pki/ scp /etc/kubernetes/pki/sa.key 10.168.4.12:/etc/kubernetes/pki/ scp /etc/kubernetes/pki/sa.pub 10.168.4.12:/etc/kubernetes/pki/ # 在master02&master03执行 kubeadm join cluster.lolaage.com:6443 --token 9t4vc1.9q2mrf0cwmnpqmxx \ --discovery-token-ca-cert-hash sha256:8c0cb820a823e897ace35b73a5b50e05bb79d8b0e1998aab0e7d138ca8005f45 \ --control-plane --certificate-key 19d77056eba525205d134e92d3e92cf872aa03a4e17593dd25933f9ec8824375
部署网络插件 在 master01 节点部署插件
使用calico网络插件 1 2 3 4 5 6 7 8 9 10 11 mkdir -p /etc/kubernetes/manifests/my.conf/network-utils curl -o /etc/kubernetes/manifests/my.conf/network-utils/rbac-kdd.yaml https://docs.projectcalico.org/v3.3/getting-started/kubernetes/installation/hosted/rbac-kdd.yaml curl -o /etc/kubernetes/manifests/my.conf/network-utils/calico-3.9.2.yaml https://kuboard.cn/install-script/calico/calico-3.9.2.yaml kubectl apply -f /etc/kubernetes/manifests/my.conf/network-utils/rbac-kdd.yaml sed -i "s#192\.168\.0\.0/16#${POD_SUBNET}#" /etc/kubernetes/manifests/my.conf/network-utils/calico-3.9.2.yaml kubectl apply -f /etc/kubernetes/manifests/my.conf/network-utils/calico-3.9.2.yaml
使用flannel网络插件 1 2 3 curl -o /etc/kubernetes/manifests/my.conf/network-utils/kube-flannel.yml https://raw.githubusercontent.com/coreos/flannel/master/Documentation/kube-flannel.yml kubectl apply -f /etc/kubernetes/manifests/my.conf/network-utils/kube-flannel.yml
查看集群节点状态 1 2 3 4 5 6 [root@master01 my-conf]# kubectl get nodes -o wide NAME STATUS ROLES AGE VERSION INTERNAL-IP EXTERNAL-IP OS-IMAGE KERNEL-VERSION CONTAINER-RUNTIME master01 Ready master 60m v1.17.3 10.168.4.5 <none> CentOS Linux 7 (Core) 3.10.0-957.21.3.el7.x86_64 docker://18.9.7 master02 NotReady master 49m v1.17.3 10.168.4.6 <none> CentOS Linux 7 (Core) 3.10.0-862.14.4.el7.x86_64 docker://18.9.7 master03 Ready master 49m v1.17.3 10.168.4.12 <none> CentOS Linux 7 (Core) 3.10.0-862.14.4.el7.x86_64 docker://18.6.3
查看状态 1 2 3 4 5 6 7 8 9 10 11 12 13 14 15 16 17 18 19 20 [root@master01 my-conf]# kubectl get pod -n kube-system -o wide NAME READY STATUS RESTARTS AGE IP NODE NOMINATED NODE READINESS GATES calico-kube-controllers-dc6cb64cb-x5xdx 1/1 Running 0 20m 10.244.241.67 master01 <none> <none> calico-node-7mn66 1/1 Running 0 20m 10.168.4.5 master01 <none> <none> calico-node-gmvpv 0/1 Init:ErrImagePull 0 12m 10.168.4.6 master02 <none> <none> calico-node-vj264 1/1 Running 0 20m 10.168.4.12 master03 <none> <none> coredns-7f9c544f75-g6tsj 1/1 Running 0 63m 10.244.241.65 master01 <none> <none> coredns-7f9c544f75-n2c2f 1/1 Running 0 63m 10.244.241.66 master01 <none> <none> kube-apiserver-master01 1/1 Running 0 63m 10.168.4.5 master01 <none> <none> kube-apiserver-master02 1/1 Running 1 52m 10.168.4.6 master02 <none> <none> kube-apiserver-master03 1/1 Running 0 52m 10.168.4.12 master03 <none> <none> kube-controller-manager-master01 1/1 Running 0 63m 10.168.4.5 master01 <none> <none> kube-controller-manager-master02 1/1 Running 1 52m 10.168.4.6 master02 <none> <none> kube-controller-manager-master03 1/1 Running 0 52m 10.168.4.12 master03 <none> <none> kube-proxy-4k4fb 1/1 Running 0 52m 10.168.4.12 master03 <none> <none> kube-proxy-kcrzj 1/1 Running 0 63m 10.168.4.5 master01 <none> <none> kube-proxy-r4bsq 1/1 Running 1 52m 10.168.4.6 master02 <none> <none> kube-scheduler-master01 1/1 Running 0 63m 10.168.4.5 master01 <none> <none> kube-scheduler-master02 1/1 Running 1 52m 10.168.4.6 master02 <none> <none> kube-scheduler-master03 1/1 Running 0 52m 10.168.4.12 master03 <none> <none>
calicoctl常用命令 下载和安装calicoctl工具,注意calico版本 1 2 3 cd /usr/local/bin curl -O -L https://github.com/projectcalico/calicoctl/releases/download/v3.9.2/calicoctl chmod +x calicoctl
查看网络节点 节点网络状态 使用calicoctl工具查看有问题的节点 #使用calicoctl工具来对calico进行更改
1 2 3 4 5 6 7 查看问题节点的yaml文件 calicoctl get node master03 -o yaml calicoctl get node master03 -o yaml > calicomaster03.yaml calicoctl apply -f calicomaster03.yaml
问题 etcd: member d54e4be0d69c6952 has already been bootstrapped 1 2 3 4 5 6 7 8 其中一个成员是通过discovery service引导的。必须删除以前的数据目录来清理成员信息。否则成员将忽略新配置,使用旧配置。 第一种方式我们可以通过修改启动参数解决这类错误。 --initial-cluster-state=existing \ **# 将new这个参数修改成existing,启动正常!** 第二种方式删除所有etcd节点的 data-dir 文件(不删也行),重启各个节点的etcd服务 第三种方式是复制其他节点的data-dir中的内容,以此为基础上以 --force-new-cluster 的形式强行拉起一个,然后以添加新成员的方式恢复这个集群。
忘记 join token 获取方法:在master01上执行
1 2 3 kubeadm token create --print-join-command 说明:默认情况下,通过kubeadm create token创建的 token ,过期时间是24小时。可以运行 kubeadm token create --ttl 0生成一个永不过期的 token,参考文档[https://kubernetes.io/docs/reference/setup-tools/kubeadm/kubeadm-token/](https://kubernetes.io/docs/reference/setup-tools/kubeadm/kubeadm-token/)。